Användarverktyg

Webbverktyg


Sidmeny

Start
Huvudsidor
Kategorier
Geodata


Vad vill du veta mer om?

About Gisela
Adress till koordinat
Analys
API
ArcCatalog
ArcGIS
ArcScene
ArcToolbox i ArcGIS 10
Attributdata
Attributdata i ArcGIS 10
Attributdata i MapInfo
Att projicera data utan koordinatsystem i ArcGIS 10

Bebyggelsedata
Befolkningsdata
Befolkningsprognos
Blå kartan
Buffer

Calculate Geometry i ArcGIS 10
Centroid
Clip i ArcGIS 10
Color GIB2
Connect folder

Datafångst
Diagram
Digitala kartbiblioteket
Distance (Spatial Analyst Tools) i ArcGIS 10
DXF
Dynamisk konisk projektion

Editera i ArcGIS 10
Editera i MapInfo
Ekonomiska kartan
Exportera attributdata till Excel från ArcGIS 10
Export Data i ArcGIS 10

Fastighetskartan
Field Calculator i ArcGIS 10
Film
Fjällkartan
Fjärranalys
Flödeskarta
Fuzzy GIB2
Färgval
Föreläsningar

Generalstabskartan
Geodata
Geodatabas
Geoforum
Geographical data, datakällor
Geometric generalisation with IDRISI Taiga
Geometrisk generalisering i IDRISI Taiga
Geometrisk generalisering
Geometrisk generalisering i ArcGIS 10
Georeferencing with IDRISI Taiga
GET
GIS
GIS filformat
GIS projekt
Google Earth Engine
Google Earth
Google Maps
Google SketchUp
Google Fusion Tables
GPS
Gradnät med ArcGIS 10
GRID
Gröna kartan
GSD
Gula kartan

Handledning Kopiering och överföring av filer
Hantera projektion och koordinatsystem i ArcGIS 10
Häradskarta
HistoryPin
Huvudsidor
Hydrologiska analyser i ArcGIS 10
Höjddata

Idrisi
Importera GRID till ArcGIS 10
Interpolering
Isaritmkarta

Join by Spatial Location i ArcGIS 10
Join from a table med ArcGIS 10
JPEG

Kanteffekter
Karta
Kartbladssystem 2007
Kartering
Kartogram
Kartprojektion
Kategorier
KG2204 3
KG2204 4
Klippa i MapInfo
KML med ArcGIS 10
KML med Google Earth 6
KML och KMZ
KML GIB2
Kom igang med ArcGIS
Kontakt
Konvertera mellan olika typer av geometriska vektorformat
Konvertera vektorfiler till tab MapInfoformat
Konvertera X och Y koordinater till linjer i vektorformat
Koordinatsystem
Koordinat till punkt med ArcGIS 10
Koropletkarta

Lab1 GIB1 HT12
Lab Point to Polygon and Point to Raster
Lantmäteriets kartor
LAS
Layout View i ArcGIS 10
Lidar
Lutningsrelaterade analyser i ArcGIS 10
Lägg till attributdata
Lägg till data i ArcGIS 10
Lästips

MapBasic
MapInfo Professional
Markdata
MBX
Metadata
MIF MID
ModelBuilder och egen Toolbox i ArcGIS 10

NASA WorldWind
Nätverksanalys
Network dataset
Norrpil
Norrpil i ArcGIS 10 0
Norrpil i MapInfo 10

Om Gisela
Ordlista

Positionering
Presentation
Prickkarta
Projicera data
Python

QGIS
Quiz

Raster from IDRISI Taiga to MapInfo 10
Raster till vektor i ArcGIS 10
Rasterdata
Raster calculator
Redigera i wikin
Referenskarta
Rektifiera i Google Earth 6
Rektifiera
Rektifiera i ArcGIS 10
Roda kartan
RT38
RT90
Rumslig kvantifiering

Saccess
Satellitnavigering
Scale with ArcGIS 10
Select i ArcGIS 10
Select i MapInfo
SGU
SHP
Siktrelaterade analyser i ArcGIS 10
Skala
Skalstock i ArcGIS 10
Skapa en buffer i ArcGIS 10
Skapa en buffer i MapInfo 10
Skapa vektordata i Google Earth 6
Skapa vektordata i MapInfo 10
Skapa tredimensionella kartor i ArcScene 10
Skapa tredimensionell höjdmodell i 3DEM
Skapa vektordata i ArcGIS 10
Svenska statens kartor genom tiderna
Sweref99
Symbolkarta

TAB
Tabell
Table of Contents i ArcGIS 10
Teckenförklaring i ArcGIS 10
Teckenförklaring i MapInfo 10
Teckenförklaring
Tematisk karta i ArcGIS 10
Tematisk karta
Terrangkartan
Terrängskuggning med ArcGIS 10
Text på kartan
Text till kolumner med Excel
TFW
TIFF
Tips ArcGIS 10
Tips Google Earth 6
Tips MapInfo 10
Tips Idrisi Taiga
Tool Not Licensed i ArcGIS 10
Topografiska kartan
Topografisk karta
Triangulering
Tyvekkartor

Utforska kartlager i ArcGIS

Vector from IDRISI Taiga to ArcGIS 10
Vector from MapInfo 10 to IDRISI Taiga
Vector to raster with IDRISI Taiga
Vectorisation with MapInfo 10
Vektor till raster i ArcGIS 10
Vektordata
Vektor till raster i IDRISI Taiga
Verktygsfalt
Visualisering av höjddata genom tiderna
Visuell hierarki
Vägdata
Vägkartan

Web GIB2
Web resources for An Introduction to Geographical information systems
WGS84
WMS

XML
X och Y koordinater till punkter i MapInfo

Överlagringsanalys
Översiktskartan

georeferencing_with_idrisi_taiga

Georeferencing with IDRISI Taiga

Open a raster file in IDRISI Taiga

Start with change the project environment to the catalog with the files you will use. If the Idrisi Explorer is compressed to the left (see the red arrow in the figure below) click at the +. If the Idrisi Explorer is hidden, click at the symbol marked with the red circle in the figure below.

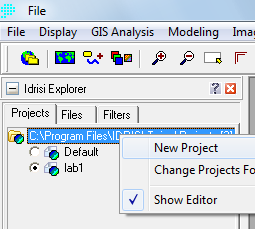
Go to Projects and rigth click anywere in that box. Choose New Project and browse to the catalog with the files you want to use.

Import the raster file you want to use with help of the commando ((choose another format if the image is not TIFF):

:File » Import » Desktop Publishing Formats » GEOTIFF/TIFF

GeoTIFF/Tiff to Idrisi should be selected. Select the image in GeoTIFF filename. The image will then be transformed to an Image file with the suffix .RST. Write the new name and check what catalog it will be in by clicking the icon to the right. Then select OK.

Metadata

One way to learn more about the file before start the acctual georeferencing is to check the metadata. Go to Files in Idrisi Explorer ((see the red circle in the figure below).

Select your file in Idrisi Explorer, the metadata for the file then appear below. The metadata includes for example the number of columns and rows and also the coordinates. Note that you can also see the coordinates in the lower part of the window when you move the cursor over the image.

Georeferencing

We need to change the geographical location of the image, i.e. create real coordinates. Select:

:Reformat » RESAMPLE

Select your image as the Input image. In the field Output image choose a new name.

We will now enter the new coordinates. We have no specific map to compare with i.e. a output reference but we have an input reference. Select the image you want to give coordinates as input reference. The map will open in a new window. Zoom in on any of the corners of the image with the composer or with icons on the menu ((Zoom window).

Under the text Digitize GCP ((Ground control points) you can find the button Input. Press input to add a control point. A circle is now created in the middle of the image; move it with the mouse to one of the corners. In the Resample window the new coordinates are visible. Write the new coordinates.

When one point is ready go to the next with Input ((under digitize GCP). Make all four points. Go on if the RMS values are reasonable ((i.e. low, not over 5). They indicate how much the image is bent/distorted. The points can be saved for future use if you want, they will get the suffix * .cor and cannot be confused with other files.

An alternative, if you know the extent of the image ”old” and ”new” coordinates. The ”old” coordinates in the image can be seen in meta data for the image.

We need to set the resolution and the limits of X and Y by pressing the “Output reference parameters” button. Write the minimum and maximum X and Y values found in the image. For the number of columns and rows, choose something similar to the original image ((found in metadata) but if the X and Y values constitute a perfect square, this must also be represented in the columns and rows. For example, minimum X: 3000 and max x: 5000 and minimum y: 6000 and max y: 8000 makes a 2000×2000 square which means that the number of columns and rows must be the same number; for example 540 columns and 540 rows.

In reference system select ”plane”.

Press OK and a new raster image is created.

Change the palette

Observe that the palette that was created in the import is not automatically incorporated in the image. You have to select it manually from the:

Composer window > Layout Properties > Palette File

Choose the one with the name of the original image.

georeferencing_with_idrisi_taiga.txt · Senast uppdaterad: 2016/04/12 10:36 (extern redigering)